
Specify MCP
Register the Specify MCP server in Claude Code, Codex, Cursor, VS Code, and Claude Desktop.
When you choose a client in your workspace under Tools & skills → Connect editor, a token for that workspace is issued, and the command or config for that client is prepared with the token already filled in. This page explains each format.
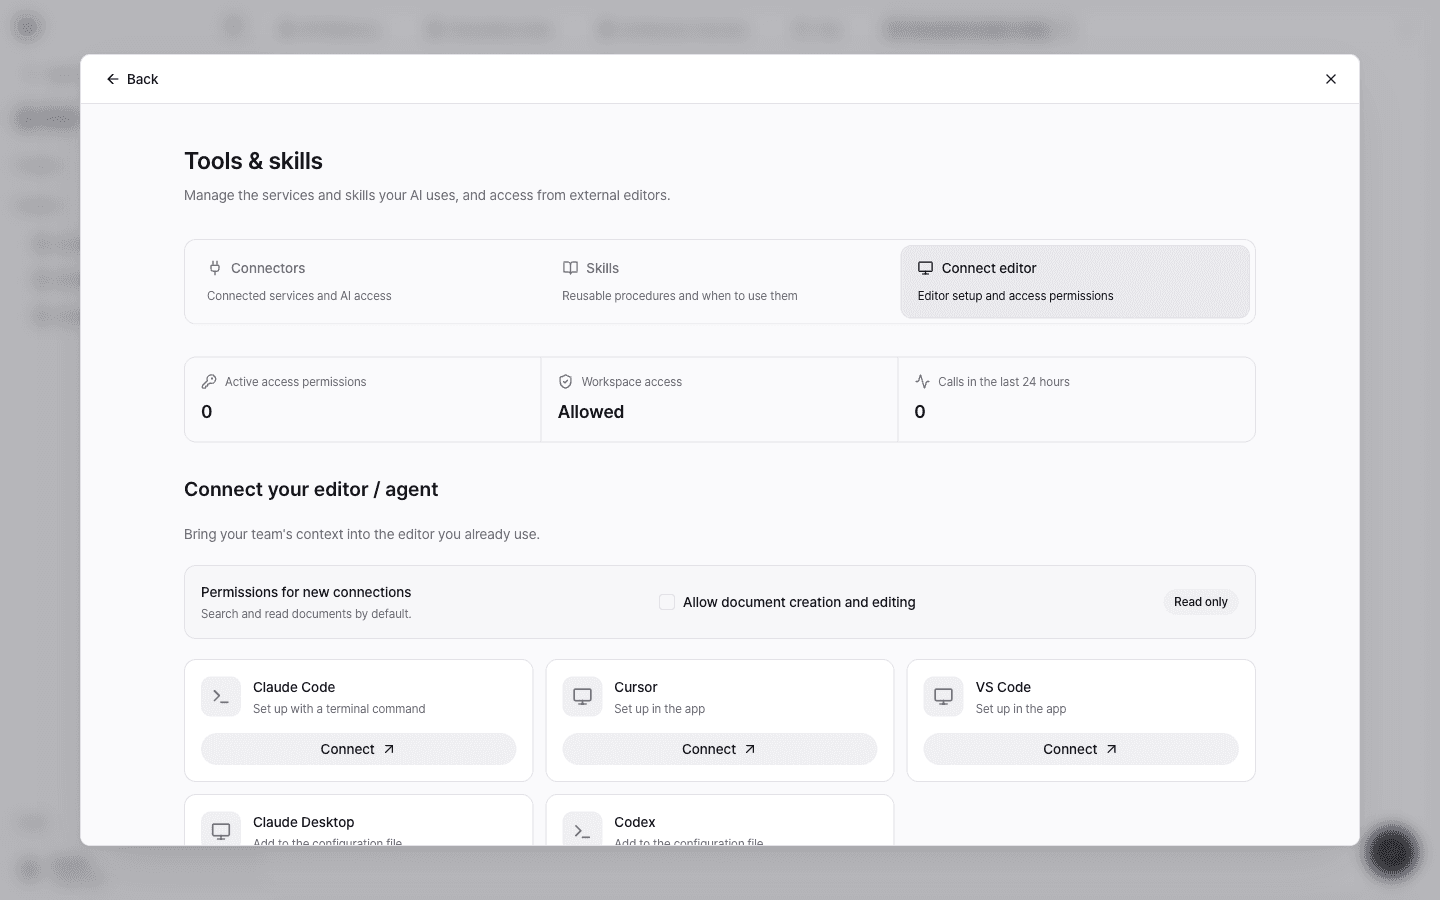
Set permissions before connecting
Before you select Connect on a client card, check Permissions for new connections. The default is Read only, which allows only searching and reading documents. If the agent needs to create or edit docs, check Allow document creation and editing before connecting. This setting applies to connections you issue from then on.
The token is shown only on the screen where it's issued. If you lose it, create a new token. Don't paste tokens into repositories, shared docs, or prompts.
In the examples below, replace <SPECIFY_MCP_TOKEN> with the token you were issued.
Connect by client
Run the following command in your terminal.
claude mcp add specify --transport http https://mcp.specify.app \
  --header "Authorization: Bearer <SPECIFY_MCP_TOKEN>"
After registering, you can search and read your workspace docs from Claude Code. Run claude mcp list to check the registration status.
Add the following config to ~/.codex/config.toml, then restart Codex. When url is set, Codex uses the Streamable HTTP transport.
[mcp_servers.specify]
url = "https://mcp.specify.app"
http_headers = { Authorization = "Bearer <SPECIFY_MCP_TOKEN>" }
When you choose Cursor on the Connect editor screen, an install deep link opens and registers the server in Cursor. If it doesn't open, copy the link shown and paste it.
To configure it manually, add the following entry to Cursor's MCP settings.
{
  "mcpServers": {
    "specify": {
      "url": "https://mcp.specify.app",
      "headers": { "Authorization": "Bearer <SPECIFY_MCP_TOKEN>" }
    }
  }
}
When you choose VS Code on the Connect editor screen, a vscode:mcp/install deep link starts the server installation. It installs the following config.
{
  "name": "specify",
  "type": "http",
  "url": "https://mcp.specify.app",
  "headers": { "Authorization": "Bearer <SPECIFY_MCP_TOKEN>" }
}
Claude Desktop's config file accepts only local (stdio) servers, so connect to the remote server through the mcp-remote proxy. After pasting the config, restart Claude Desktop.
{
  "mcpServers": {
    "specify": {
      "command": "npx",
      "args": ["-y", "mcp-remote", "https://mcp.specify.app", "--header", "Authorization:${AUTH_HEADER}"],
      "env": { "AUTH_HEADER": "Bearer <SPECIFY_MCP_TOKEN>" }
    }
  }
}
The header value is passed through the AUTH_HEADER environment variable. Write it with no space after Authorization: so the argument doesn't contain a space.
Don't add a remote entry in the type, url, headers format directly to the Claude Desktop config. Claude Desktop may erase your entire mcpServers config. Use mcp-remote as shown above.
Connect with OAuth
The Specify MCP server also supports the OAuth authorization code flow (PKCE S256, dynamic client registration). Clients that support OAuth can register just the server URL without a token, then sign in to Specify in the browser and approve the workspace and scope to connect. If no scope is specified, read-only access is approved.
Verify the connection
- Ask the agent something like "Find the onboarding docs in Specify" and check that the search tool is called.
- In the Editor access list on the Connect editor tab, you can see the issued permissions and when they were last used. This list may differ from the actual editor connection status.
Troubleshooting
| Symptom | What to check |
|---|---|
| Authentication error | Check that the token hasn't been revoked and that the Bearer prefix is included. |
| Tool calls are rejected | A workspace admin may have blocked external editor access or not allowed that operation. See Tokens and access policies. |
| Creating or editing docs doesn't work | The token doesn't have write scope (mcp:write), or your workspace role is below Editor. |
| A message says the MCP server URL is not configured | Contact your workspace admin. |